


Contents
General questions
What is EUSurvey?
EUSurvey is an online survey management tool to create, publish and manage questionnaires and other interactive forms in most web browsers.
When do I use EUSurvey?
Use EUSurvey whenever you want to make a questionnaire or interactive form accessible online, or to record a large number of similar datasets.
What are the limits of EUSurvey?
Please open the Support page to find the 'Usability limits' of the tool.
EUSurvey may not be the right tool for your project if:
- different participants need to work on the same contribution before it is submitted
- contributions need to be validated before they can be submitted
Please contact DIGIT-EUSURVEY-SUPPORT for additional information, upcoming features and possible workarounds.
What are the features of EUSurvey?
Customizable forms
In the easy-to-use editor you can choose from a variety of question types; from simple text and
multiple-choice questions to spreadsheet questions or multimedia survey elements. Structure your survey
using special structural elements.
Dependent questions
EUSurvey can display additional questions and fields, depending on the answers given by the participant,
making the survey interactive.
Scheduled publishing
Publish and unpublish your survey automatically at a specified point in time.
Modify your form after publication
You can modify a published survey without losing any contributions.
Languages
The user interface is available in 23 of the official EU languages, and you can translate your form into
any of the 136 languages covered by ISO 639-1, from Abkhaz to Zulu.
Security
EUSurvey has the infrastructure needed to secure the online forms.
Sending out invitations directly from the application
Selected contacts can be managed in the 'Address Book' and used to send out individual emails to every
single contact containing individual access links.
Advanced privacy
You can ensure that participants remain anonymous by activating the 'Anonymous survey mode'. When this option is enabled, all contributions are recorded anonymously. No user-related data will be collected or stored.
Customise the look and feel
With the built-in CSS style editor and embedded rich-text editors for all visible elements, you have
full control over the form's layout. A large list of survey themes makes it easy to adapt the form to a
project's identity. You can choose between single page and multi-page surveys
Save a contribution as draft
You can allow participants to save their contribution as a draft on the server and continue later.
Offline answering
With EUSurvey, you can answer a form offline before submitting a contribution to the server at a later
point in time.
Automatic numbering
To structure your survey, EUSurvey can number your form's elements for you.
Enhanced contrast
Visually impaired participants can choose a high-contrast version of the survey. This is created
automatically for each form.
Uploading supporting files
You can add files to your survey by uploading them. These files can be downloaded by every participant
in your survey.
Form management
Working together
For surveys that are managed by multiple users, EUSurvey lets you define advanced permissions for other
users to test a survey or to analyse the results.
Result management
Analysing your results
EUSurvey offers basic result analysis capabilities and visualization of data in histograms and chart
views. You can also export survey results to standard spreadsheet formats in order to import them into
statistical applications.
Publishing your results
Use the possibilities EUSurvey offers to publish a sub-set of all submitted answers on the internal
pages of the application. Statistics and charts can be calculated and created automatically by the
system.
Editing submitted contributions
Let your participants modify a contribution after it has been submitted, if they want to.
Where do I find additional information about EUSurvey?
Please find practical information behind the ' Support ' link under 'Help' at the top-right of the application. Consult the ' About ' page for additional information on the application's background and funding.
Whom do I contact if there are technical problems with EUSurvey?
EU staff should contact their IT helpdesk and ask them to forward the problem to DIGIT-EUSURVEY-SUPPORT, describing it as precisely as possible.
External users should contact the Commission's CENTRAL HELPDESK .
Whom do I contact if I have new ideas for improving EUSurvey?
We always welcome your comments and feedback! Please ask your IT helpdesk or the CENTRAL HELPDESK to forward your suggestions to the EUSurvey support team. The support team will get back to you as soon as possible to discuss the relevant use cases and whether your idea can be incorporated in a future version of the application.
Which browsers are supported by EUSurvey?
The last two versions of Microsoft Edge, Mozilla Firefox and Google Chrome are supported by EUSurvey. Using other browsers might cause compatibility problems.
EUSurvey disclaimer (for non-EU users only)
For all questionnaires and invitation mails coming from a survey that has been created by a user not working officially for the EU institutions, the following disclaimer will be displayed in the survey and email message:
Disclaimer
The European Commission is not responsible for the content of
questionnaires created using the EUSurvey service - it remains the sole
responsibility of the form creator and manager. The use of EUSurvey
service does not imply a recommendation or endorsement, by the European
Commission, of the views expressed within them.
Can my participants answer my survey from a mobile device?
Yes, EUSurvey features a responsive design for the published survey. This means, the design of the questionnaire will adapt to the resolution of the device used to enter your survey. This will allow your participants to conveniently contribute to your survey from a mobile device (mobile phone or tablet PC).
Is there a minimum screen size?
The online questionnaires are fully responsive and adapt to the size of your device, allowing to fill in the questionnaire with any screen size.
For creating and managing surveys, we recommend to use a minimum resolution of 1680x1050 pixels for a good user experience.
Login and EU Login registration
I have an EU Login account. Do I need to register separately for EUSurvey?
No, there is no need to register separately to EUSurvey. An EU Login account is enough. You can access EUSurvey by clicking on the login button on the EUSurvey homepage . This takes you to the login screen (see below for more details).
How do I connect to EUSurvey?
Please click on the login button on the EUSurvey homepage . You will be redirected to the EUSurvey login screen.
Once you arrived on the login screen, you have to choose the option corresponding to your personal case:
- If you work for an EU institution, choose the second option to connect to the EUSurvey application. Your EU Login username and password will then be sufficient.
- If you don't work for an EU institution (Externals), choose the first option to connect to the EUSurvey application. You will need to have previously registered your mobile phone to pass the two-factor authentication .
If you don't have an EU Login account, please create one by clicking here .
In case you don't work for an EU institution, please also register your mobile phone by clicking here .
Creating a survey
How do I create a new survey?
On the 'Welcome' page or the 'Surveys' page, click on 'New Survey' 'Create new Survey' option and a dialogue box will open. Once you have entered all mandatory information, click on 'Create'. The application will load your new survey into the system and open the 'Editor' automatically, so you can start adding elements to your survey right away.
What type of surveys can I create?
When creating a new questionnaire, you can choose between the following options:
-
Standard survey
It is the standard type of the survey to create a questionnaire. -
Quiz
A quiz is a special type of survey that allows calculating a final score for each participant. Such surveys can be used e.g. as skill tests or electronic exams. You will find detailed information about the creation of a quiz survey in the EUSurvey quiz guide .
The quiz mode includes amongst others:- A scoring feature
- The verification of participants' answers
- The possibility to provide feedback to your participants, depending on their answers
- Additional result analysis that has been specifically designed for quizzes
-
BRP Public Consultation
This survey type is used specifically for running public consultations via the Better Regulation Portal (published on the ' Have your say ' Europa website).
The BRP template provides:- Dedicated, immutable metadata fields allowing uniform identification of respondents across different surveys and thus simplifying the reporting
- Tailored privacy statement taking into account the specific constraints of public consultations
- Automatic opening and closing of the survey from BRP
- Automatic synchronisation of the respondents’ answers to BRP for further processing
How do I import an existing survey from my computer?
On the 'Welcome' page or the 'Surveys' page, click on 'New Survey' 'Import Survey' option and a dialogue box will open. Once you have selected a survey file from your computer, click on 'Import' and your survey will be added to EUSurvey.
Note: you can only import surveys as zip files or with the file extension .eus.
Where can I find all surveys that I have created?
There are two ways to find them. First, on the dashboard page, you will find a list of all the surveys you have created. The second way is to go to the 'Surveys' page and select the 'My Surveys' option in the search panel.
How do I open an existing survey for editing, etc.?
From the 'Surveys' page, click on the 'Open' icon of the survey you want and the 'Overview' page will open with several new tabs. From here you can go to the 'Editor', test your survey, or access the survey's 'Results', 'Translations', 'Properties' etc.
How do I copy an existing survey?
On the 'Surveys' page, open the survey you want and click on the 'Copy' icon. In the dialogue box that opens you can modify the necessary settings, and then click on 'Create'. Your survey will be added to the list on the 'Surveys' page. You can start editing right away.
How do I remove an existing survey?
On the 'Surveys' page, open the survey you want and click on the 'Delete' icon. Once you have confirmed, your survey will be removed from the list of surveys.
Beware: deleting a survey removes every trace of your questions and your results from the EUSurvey system! This cannot be undone!
How do I create WCAG compliant questionnaires with EUSurvey?
The Web Content Accessibility Guidelines (WCAG) consist of a set of guidelines for making content accessible, primarily for people with disabilities, but also for software such as mobile phones.
If you wish to make your survey WCAG compliant, please follow the instructions explained in this document .
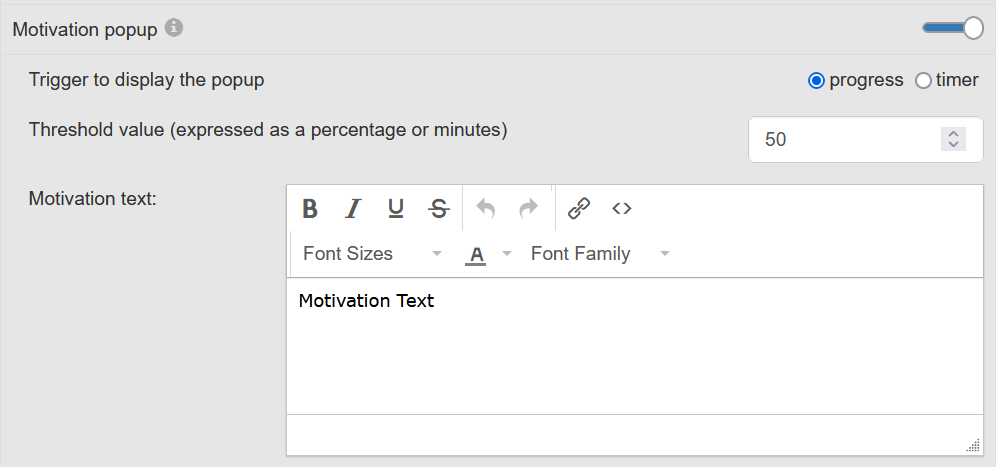
What is the 'Motivation popup' and how to use it?
The 'Motivation popup' is a dialog window which opens to the survey participant during the completion of the form. It displays a message to motivate the participant to continue his progress. This message is customisable as well as the time at which the popup is displayed.
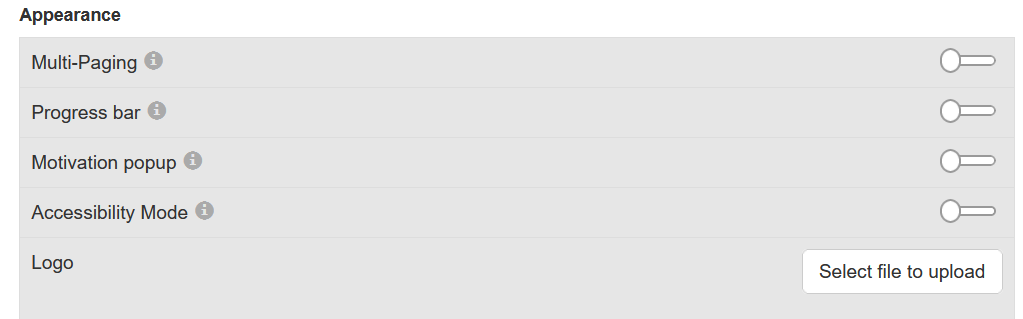
'Motivation popup' is available in the survey's 'Properties' under the 'Appearance' tab.
Once the switch has been activated, the options appear.
The 'Trigger' can be based on the progress or a timer.
'Progress' is expressed as a percentage. For instance, 50%. This means that the popup will be displayed as soon as the survey participant answered 50% of the questions.
In case the 'timer' option has been selected, the popup will be displayed after X minutes. X being the number of minutes specified in the 'Threshold value' field.
Finally, the text is customizable using the 'Motivation text' field.
Editing a survey
How do I start the Editor?
First make sure that you have opened an existing survey: Go to the 'Surveys' page and click the 'Open' icon of the survey you want to edit. From the 'Overview' page, click 'Editor' to open it and to start with the editing of your questionnaire.
Please make sure to save your work from time to time.
How do I create a questionnaire via the EUSurvey editor?
The editor is used to create a questionnaire. You can use it to add questions and other elements to your questionnaire.
You will find detailed information about the functionalities of the Editor in the EUSurvey Editor Guide .
The editor consists of five different areas:
-
Navigation pane:
The Navigation pane provides a structured view of the questionnaire. All elements are represented by their respective text label in the questionnaire. When you select an element in the Navigation pane, the Form area jumps to the selected item which is then highlighted in blue. -
Toolbox pane:
The Toolbox pane contains all the element types that you can add to your questionnaire. You can add elements either by using the drag-and-drop feature or by double-clicking them. -
Form area:
Provides a preview of the questionnaire; elements can be added to it and selected for editing. -
Element properties pane:
It displays the settings for selected elements. You can edit the elements here, e.g. by changing the question text, adding help messages and changing all relevant settings to adapt the question to your needs. -
Toolbar:
It includes all available basic tasks that you can perform when creating the questionnaire.
How do I add or remove questions to my questionnaire?
To add new elements to your form or remove existing ones, first open the editor.
In the editor you will find a Toolbox of available elements on the left and the Form area in the middle of the screen. The elements contain default texts, with the name of the element displayed as the question text. To add a new element (question, text field, image, etc.), select one from the Toolbox. You can add elements either by using the drag-and-drop feature or by double-clicking them.
To remove an element from the form, you can click the element to select it. Click on 'Delete'; as soon as you have confirmed, the element will be removed from the questionnaire.
See also 'How do I create a questionnaire via the EUSurvey editor?'
How do I edit elements in my questionnaire?
The elements in your questionnaire will be selected for editing in the Form area and edited in the Element properties pane of the Editor. See 'How do I create a questionnaire via the EUSurvey editor?'
You can click an element in the Form area to select it. The selected element appears in blue, with the respective options visible in the Element properties pane. You can edit the elements there, e.g. changing the question text, adding help messages and changing all relevant settings to adapt the question to your needs.
To edit a text:
- Click on the text or the pen icon.
- Modify the text.
- Click 'Apply' to see the changes in the Form area.
By default, the Element properties pane displays all the basic options. To display more options, click 'Advanced'.
For matrix and text questions, you can also choose the individual questions/answers/rows/columns of the element by clicking the respective label text as indicated below. This way, you can e.g. select individual questions of a matrix or table element and make them mandatory.
How do I copy items?
To copy elements in your form, first open the Editor.
Any elements that have been copied or cut are depicted by a placeholder at the top of the Toolbox pane. You can add them to the questionnaire again using the drag-and-drop feature. You can also use the button next to the element to cancel this operation.
- Select the element(s).
- Click 'Copy'.
- Move the placeholder from the Toolbox to the Form area as described above or select the element in the Form area and click 'Paste after'.
See also 'How do I create a questionnaire via the EUSurvey editor?'
How do I add or remove possible answers in choice questions?
You can add or remove possible answers by clicking the plus/minus button in the Element properties pane. Edit the text of the existing answer options by clicking the pen icon next to 'Possible answers'. You can then edit them in the rich text editor.
See also 'How do I create a questionnaire via the EUSurvey editor?'
Can I make a question mandatory?
In the editor, select the check box in the Element properties pane after selecting the respective element.
Mandatory questions will be marked with a red asterisk to the left of the question text.
How do I move items within the questionnaire?
In the editor, you can change the position of an element in your questionnaire by using one of the following options:
Drag-and-drop:
Select the element in the Form area and drag it to where you want in the questionnaire.
Move buttons:
Select the element you want to move and use the move up/move down buttons in the Toolbar on top of the
Form Area to move it up or down.
Cut-and-paste:
Cut the element you want to move and use the drag-and-drop feature to move the placeholder to where you
want to put it.
How do I use the visibility feature (dependencies)?
Using this feature in the editor, you can display and hide elements depending on answers given by participants to either single/multiple choice or matrix questions (see also 'How do I create a questionnaire via the EUSurvey editor?' )
By default, all elements are set to always visible, which means that everybody will see the question when answering the survey.
To create a dependent question:
- Add a single/multiple choice or matrix question to your questionnaire.
- Add further elements to your questionnaire.
- Select an element that follows a single/multiple choice or matrix element and that should only appear when a specific answer has been chosen.
- Click the pen icon to edit the visibility settings. All available questions of the type single choice, multiple choice and matrix that are placed above the selected element(s) are displayed, including the question text and the possible answers.
- Select the answer that, when chosen, will display the selected element.
- Click 'Apply' to confirm the visibility setting.
If multiple elements are selected, you can edit the visibility settings for all of them at once.
Note: This modification will only affect the questionnaire on the Test page and in published mode. All elements will still be visible in the editor.
When activated, arrows are displayed next to the connected elements to visualise the visibility settings in the Form area. Answers that trigger any element are displayed with an arrow pointing down. Elements that are triggered by any answer are marked with an arrow pointing up.
When moving the pointer over the arrows or IDs in the Element properties pane, the connected elements are highlighted in the Form area and Navigation pane.
Elements with visibility settings that have been edited will be hidden in the questionnaire until at least one of the configured answers has been selected by the participant when filling in the questionnaire.
Can I generate the order of answers in a single or multiple choice question?
When creating a single or multiple choice question, you will have the option to generate their answers in three different ways:
- Original Order
- Alphabetical Order
- Random Order
Original Order: This option will display the original order of your answers on the survey.
Alphabetical Order: You can select this option if the answers should be displayed alphabetically on the survey.
Random Order: You can choose this option if the answers should be randomly displayed on the survey.
How do I give other users permission to edit my survey?
Open your survey and open the 'Privileges' page. Click on 'Add new user' or 'Add department'. A wizard will pop up that guides you through the process of adding users. Next you can give them specific access rights. Simply click on the colour to change the rights.
- Green: Read and Write access
- Yellow: Read access
- Red: No access
Added users will automatically see your survey in their list of surveys next time they log into EUSurvey.
External owners or survey organizers cannot see EU domains on the Privileges tab / Add users button, therefore, they cannot provide access for these persons directly. Please contact us to request privileges for external users.
Read more about this under 'How do I give other users access to my survey?'
Which languages are supported by the application?
Languages which can be encoded in '3byte UTF-8' can be used to create a survey.
So why UTF-8 and which fonts should be used?
Keep in mind that the target group of participants can display the survey easily if the font you used is installed in their browser. UTF-8 is the most common encoding for the HTML pages. On the other hand, choosing non-supported fonts may affect the rendering of PDF export.
We recommend using the supported character sets listed below:
- Freesans ( https://circabc.europa.eu/sd/a/36f72861-fc6e-4fe1-87d6-0a8e1c6fa161/EUSurvey-SupportedCharacterSet(freesans).txt )
- Freemono ( https://circabc.europa.eu/sd/a/55ce0f35-b3cc-4712-80bf-af42800a278f/EUSurvey-SupportedCharacterSet(freemono).txt )
- Freeserif ( https://circabc.europa.eu/sd/a/29cd78bb-9eeb-40b1-a22f-b54700750537/EUSurvey-SupportedCharacterSet(freeserif).txt )
- Commonly supported character-set ( https://circabc.europa.eu/sd/a/1eb30efd-e2d8-4c3b-9f55-533bb903f7d0/EUSurvey-SupportedCharacterSet(common).txt )
'Freesans' is the default font used
In case of doubt, run a PDF export of your final survey to check if your survey is rendered correctly in PDF. Beware however that some contributions may not to be rendered correctly in PDF. Your participants, indeed, are free to choose any font among those which are supported by the application. Even though the application is unable to render the characters they have used, these are saved correctly on the EUSurvey's database. Thus they can be exported from the results page.
Complexity indicator
Keeping your survey short and simple will ease the filling of your survey by the respondents and lead to a better user experience. Of course, sometimes you need to add branch logic using dependencies (i.e. dependent questions that are hidden/displayed depending on the previous answers given). This is fine, but please bear in mind that adding too many items or dependencies to your survey makes it too 'complex'. This can lead to the system slowing down for participants when filling out your questionnaire.
This is why there is a little indicator at the top-right corner of the form editor:

Your survey could have a high level of complexity for several reasons:
- too many dependencies
- too many cascading dependencies
- too many table/matrix items
For more information, see our best practices guide and do not hesitate to contact the EUSurvey support team for assistance in re-designing your form if needed.
What is the contribution ID?
Contribution ID is a code used as unique identifier for a contribution made.
It can be used by survey managers to find back a contribution from the 'Results' screen. It can also be used by a survey participant to submit his contribution and access it later.
How can I find a contribution from the results using a contribution ID?
Contribution ID can be used by survey owners to find a contribution among all the results:
- Open your survey
- Go to 'Results' tab
- Click on 'Settings' button
- Tick 'Contribution ID' in both columns and press 'OK'
- Go to filter 'Contribution ID'
- Insert the 'Contribution ID' and click Enter
Randomization feature
When using a first-level Section, you have the possibility to keep the questions/elements underneath as in their original order or to randomize their position. Randomization can be selected in the Section Properties just next to Order.
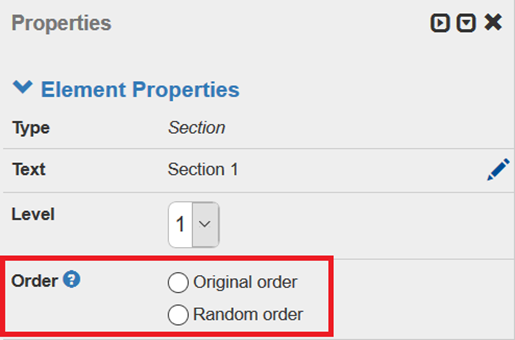
Please also note the following:
- All survey elements (including images and static text) are randomized.
- If a question triggers a visibility change or is triggered by a visibility change, it's position is not changed. It is always shown before the other 'randomized' elements.
- Sub-sections and their questions (level 2 and 3) are also randomized, but their order within the level 1 Section they belong to is kept. This means that questions under a sub-section are also randomized when the level 1 Section is randomized.
- PDF version of the survey ('Download PDF version' feature) always shows questions in the original order.
- PDF contributions always show questions in the original order.
- In case the Section/Question numbering is activated in conjunction with the Randomization feature, then the Question numbers will also be randomized along with the questions.

There is another point specific to DELPHI surveys:
- The DELPHI start page shows the questions in their original order.
Formula field
This question type called 'Formula' calculates and displays a value based on the data entered by the participant. It allows you to display a total or an average for example and adds an interactive aspect to your survey.
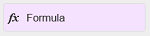
Main points of the question element:
-
Ready-to-use functions are available for different use cases:
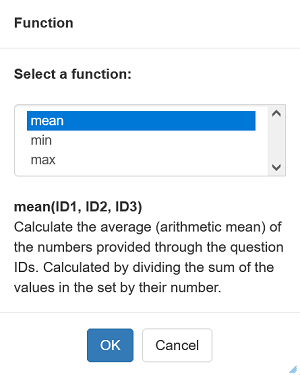
-
Users can also type their formula in the 'Formula' field:
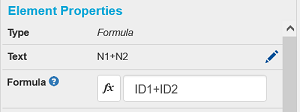
Element IDs are used to compose the formula. The list of IDs is displayed to allow you to directly select the IDs you need. You can also enter them directly in the input field.
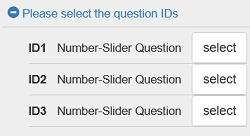
Please note that element IDs are visible in the 'Advanced' section of the element properties.

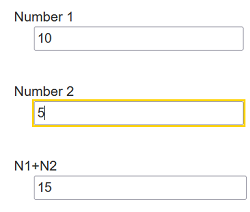
Example 1:
In the example below, the 'Formula' field is the sum of the two 'Number-Slider' questions above.
Therefore, as soon as the survey participant has entered the second value (5 in our example),
the sum is calculated and displayed in real-time.
Example 2:
In the example below, you can ask your survey participant to enter either his monthly or yearly rent.
The application will calculate automatically the other. Both fields remain editable by the user.
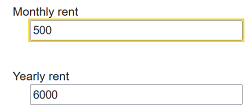
Survey participant has entered 500 and 6000 has been calculated.
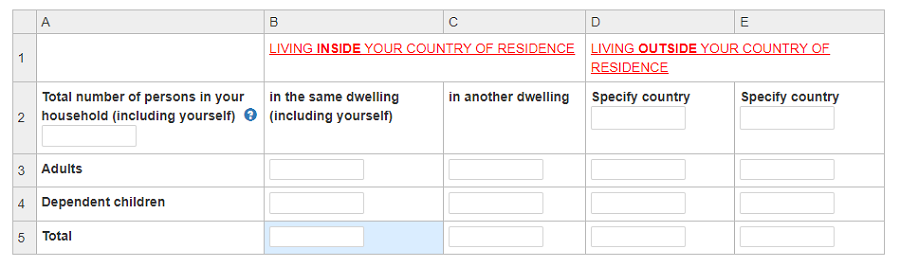
Example 3 'Read only' option:

In the example below, line 5 is showing the total for each column. Those fields use the 'Read only' option, so that, the total cannot be modified by the user.
Regular Expressions
What is a Regular Expression?
A Regular Expression (or "regex") is a sequence of characters that defines a search pattern. In EUSurvey, regex is used to control and validate what users can enter in survey fields, ensuring responses match the format you need.
How to Use Regex in EUSurvey
Regex in EUSurvey is most commonly used to:
- Validate text input (e.g., emails, phone numbers, IDs)
- Enforce specific formats (e.g., dates, project codes)
How Regex Works
A regex pattern describes what you want to match. The system checks user input against this pattern and only accepts it if there's a match.
Example:
- The pattern
^[A-Za-z]+$only accepts letters (no numbers or symbols). - The pattern
^[0-9]+$only accepts numbers.
Common Regex Elements
Character classes:
\d: Any Digit (0-9)\w: Alphanumeric character\s: Whitespace character
Quantifiers:
+: One or more*: Zero or more?: Zero or one{n}: Exactly n occurrences
Anchors:
^: Start of the string$: End of the string
Groups and alternation:
(abc): Groups Charactersa|b: Matches a or b
Practical Regex Examples for EUSurvey
-
Validation of the 24 EU Official Language Codes
Regex:
^(BG|ES|CS|DA|DE|ET|EL|EN|FR|GA|HR|IT|LV|LT|HU|MT|NL|PL|PT|RO|SK|SL|FI|SV)$Matches: Any of the 24 official EU language codes.
Examples: EN, FR, DE
-
European Commission Internal Telephone Number
Regex:
^[+]\d{3}\s\d{4}\s\d{5}$Format:
+XXX XXXX XXXXXExample:
+322 3456 78901 -
EU Project / Grant Code Validation
Regex:
^[A-Z0-9]+(-[A-Z0-9]+)*$Validates: Typical EU project or grant codes, consisting of letters and numbers separated by dashes.
Examples:
H2020-ICT-2020-1,FP7-ENV-2018-2 -
Validation of a UNIT or DG of the European Commission
Regex:
^[A-Za-z]+.[A-Za-z0-9-]+(?:.[A-Za-z0-9]+)?$Validates: Identifiers such as DG (e.g.,
DIGIT), Directorate (e.g.,DIGIT.A), or Unit (e.g.,DIGIT.A.4).Examples:
DIGIT.A.4,ENV.B.2 -
Email Address Validation
Regex:
^[^\s@]+@[^\s@]+\.[^\s@]+$Checks: That the input follows a standard email format.
Example:
john.doe@example.eu -
Date in Format YYYY-MM-DD
Regex:
^(19|20)\d\d([- /.])(0[1-9]|1[012])\2(0[1-9]|[12][0-9]|3[01])$Validates: Dates between 1900-2099 with separators like
-,/,., or space.Example:
2025-12-04 -
Numbers Only
Regex:
^[0-9]+$Allows: Only digits (0-9).
Example:
12345 -
Age Validation
Regex for age between 20 and 99:
([2-9][0-9])Regex for age between 18 and 35:
(1[8-9]|2[0-9]|3[0-5])Example:
27 -
Luxembourg Phone Numbers
Regex:
^((+|00\s?)352)?(\s?\d{2}){3,4}$Validates: Luxembourg landline numbers with optional country code.
Example:
+352 26 12 34 56 -
Luxembourg Mobile Phone Numbers
Regex:
^((+|00\s?)352)?\s?6[269]1(\s?\d{3}){2}$Validates: Luxembourgish mobile numbers starting with common prefixes.
Example:
+352 621 123 456
Why Use Regex in EUSurvey?
Regular expressions help you automate validation and reduce errors in survey responses. By setting clear rules, you ensure that the data you collect is consistent and usable.
For more information on regex, visit https://www.w3schools.com/js/js_regexp.asp
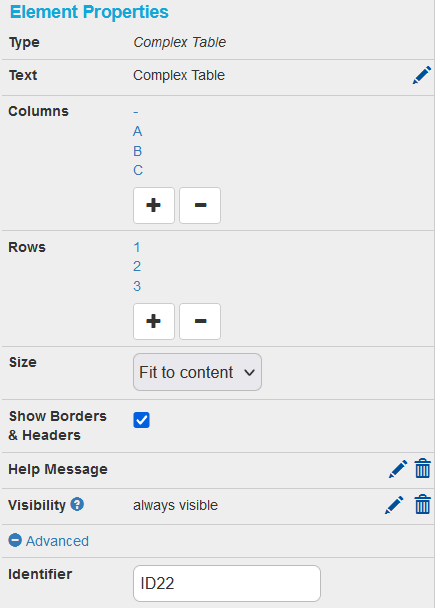
Complex Table
'Complex Table' is a table-like survey element that allows you to compose other survey items in a more complex way. It enables visual linking of different questions and layout of text passages (e.g. displaying text in columns).
How do I configure a 'Complex Table'?
In the survey 'Editor' add a 'Complex Table' element and select it. The 'Element Properties' provide the same setting options as the regular 'Table' element.
How do I configure the 'Complex Table' single cells?
Select a single cell in the survey preview section.
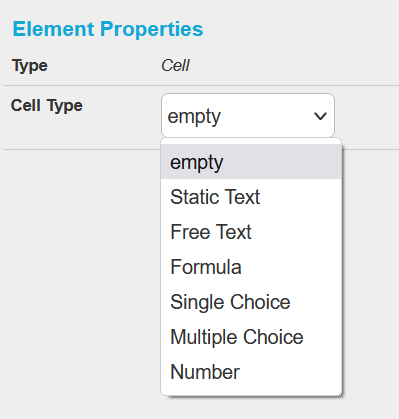
You can specify different question types into different cells. Those types correspond to the standard question types.
'Static Text' can be displayed in columns by using the 'Column Span' property. Note that it can only span subsequent cells, thereby removing the contents of those cells if they were already configured.
The other available cell types ('Free Text', 'Formula', 'Single Choice', 'Multiple Choice', 'Number') are basically the same as their regular counterparts outside a 'Complex Table' and can be edited in the same way.
How to display text in columns?
Text passages can be displayed in columns by splitting the text over several 'Complex Table' cells. Configure the type of the respective cells to 'Static Text'. Under 'Element Properties > Text' the desired text can now be entered for each cell individually.
How can cells be configured so that they are not editable?
The cell types of the 'Complex Table' that cannot be edited are 'Static Text' and 'Empty'.
For other cell types, the 'Element Properties > Read only' can be used to prevent direct user input.
How can a cell be configured so that its text spans multiple columns?
Text in 'Complex Tables' can be configured to span across multiple columns. Select a cell with the 'Cell Type > Static Text'. Under 'Element Properties', the 'Column Span' option is responsible for how many columns are covered. Note that this function covers subsequent cells, thereby removing the contents of those cells if they were already configured.
How can I delete a question in a 'Complex Table' cell?
The content of cells in a 'Complex Table' cannot be removed individually using the editor's delete function. Instead, the 'Cell Type' of the cell must be reset to 'Empty'.
How can I get a chart in the statistics screen?
Min and Max values must be set; At most 10 values are possible.

Survey security
How do I restrict access to my survey?
By default, an EUSurvey online form is publicly available as soon as it has been published. You can change this and allow only privileged users to access the survey by setting the survey to 'Secured' in the 'Security settings' on the 'Properties' page. You can then allow access to your privileged users by either:
- Inviting your participants with the EUSurvey invitation module (see ' Inviting participants '). Each participant will get a unique access link. OR
- Securing your survey by EU Login. In the 'Properties' page enable the options 'Secure your survey' and 'Secure with EU Login'. If you are a member of an EU body, you can choose either to allow all users with an EU Login account (members of the EU institutions and external EU Login accounts) to access your survey, or to grant access only to members of the EU institutions. OR
- Setting up a password. This will be the same for all participants and you will have to communicate it to your audience. Practically, you will send the survey location link and the global password (see ' How do I set a password for my survey? ').
How do I set a password for my survey?
To protect your survey with a password, edit the 'Secured with password' option under 'Properties'. To invite individual contacts to access your secured survey, please read the Help section ' Inviting participants '.
How do I ensure that an user does not submit more than a defined number of contributions to my survey?
To ensure that an user does not submit more than a defined number of contributions to your survey, in the 'Properties' page enable the options 'Secure your survey' and 'Secure with EU Login' and set the number in the 'Contributions per user' option.
What do I do to prevent robots from submitting multiple contributions to my survey?
Automatic scripts can falsify the outcome of an online survey by submitting a high number of contributions. To prevent this, you can use EUSurvey to make participants solve a CAPTCHA challenge before submitting a contribution.
You can enable/disable the CAPTCHA in the 'Security' settings under 'Properties'.
N.B. Although this won't make fraud impossible, it might discourage people from continuing to try to falsify survey results.
Can I enable survey respondents to access their contribution after submission?
Yes. Click on 'Security' under the 'Properties' tab, and then, enable the 'Allow participants to change their contribution' option.
To edit/change their contribution after submission, participants can go to this page: https://ec.europa.eu/eusurvey/home/editcontribution
Your survey participants will need to know their contribution ID. This ID is provided to them upon submission of their contribution on the Confirmation page.
Please note that the 'Edit contribution' link is accessible on the EUSurvey landing page: https://ec.europa.eu/eusurvey/home/welcome
How can I allow participants to print or download their contribution?
If activated, this feature allows participants to save their answers in PDF format.
To activate this feature, follow the steps below:
- Open your survey
- Go to 'Properties' tab
- Go to 'Security' tab
- Enable 'Allows participants to print their contribution and receive it as a PDF' option

How can I allow participants to change (edit) their contribution?
If activated, this feature allows participants to change/edit their answers after being submitted.
To activate this feature:
- Open your survey
- Go to 'Properties' tab
- Go to 'Security' tab
- Enable 'Allows participants to change their contribution' option

Testing a survey
Can I see how my survey will behave after it has been published?
Yes. Please open the survey in EUSurvey and click on 'Test'. You will see the current draft of your survey, and you can access every feature of the published form. You can save the test as a draft or directly submit it as your contribution.
How can my colleagues test my survey before it is published?
The 'Test'-page of your survey can also be tested by your colleagues. To give access to this page, open your survey in EUSurvey, go to the 'Privileges' tab and click on 'Add User' or 'Add Department'. A wizard will guide you through the process of adding your colleagues. To give them appropriate access rights for testing, change the colour of 'Access Form Preview' to 'Green'. Simply click on the colour to change the rights.
The added users will automatically see the survey in their 'Surveys' page once they log into the EUSurvey application. Read more about this under ' How do I give other users access to my survey? '
External owners or survey organizers cannot see EU domains on the Privileges tab / Add users button, therefore, they cannot provide access for these persons directly. Please contact us to request privileges for external users.
Translations
How do I translate a survey?
EUSurvey offers various ways to make the survey available in multiple languages. Important: Be sure to finish editing and testing your survey before starting on the translations!
Open your survey and go to the 'Translations' page. Click on 'Add New Translation'. Select the language from the list of supported languages. If the required language does not appear in the list, select 'other' and specify a valid two-letter ISO 639-1 language code. Click 'OK' to add the empty translation form to your survey. Please read ' Can I edit an existing translation online? ' for more information on how to add new labels to your newly created translation.
Don't forget to select the box 'To Publish' if the translation is to be published along with your survey. Once you add a translation for publishing, participants can choose from the available languages directly from the survey link.
How can I upload an existing translation to my survey?
Open your survey and open the 'Translations' page. Click on 'Upload existing translation'. A wizard will guide you through the process of uploading the translation.
Can I edit an existing translation online?
Yes! Open your survey, go to the 'Translations' page and select one or more translations to edit. Select 'Edit Translations' from the action menu just above the list of available translations and click on the 'OK' button. This will open the online translation editor that will allow you to edit multiple translations at a time. Please click the 'Save' button to make sure that your changes are written to the system.
In order to edit only one translation, open your survey, go to the 'Translations' page and click on the pen icon in the 'Actions' column.
Can I create my translations offline?
Yes! Open your survey, go to the 'Translations' page and export your survey as an XLS, ODS or XML file to perform the translation offline. The translation can then be imported back into your survey.
The usual workflow is to export a language version with status 'Complete' and then translate all available text labels into the new language. Ensure that the new language code is specified at the beginning of the form to ensure that the system recognizes the language of your translation. Once the survey has been translated offline, click 'Upload existing translation' to add it to the system. To ensure that no translation is overwritten by accident, you will have to specify the language version you are about to upload. For security reasons you can select individual labels to replace if you do not want all labels to be taken into account.
How do I publish/unpublish my translations? Why can't I publish this translation? What is an 'Incomplete' translation?
To publish a survey in multiple languages, open your survey, go to the 'Translations' page and tick/untick the individual translations you want to publish/unpublish under 'To Publish'. Then change to the 'Overview' page of your survey to publish your survey. If the survey had been published before the translations were added/removed, click on 'Apply Changes'.
To ensure that no translations with missing text are published, you cannot publish translations that have empty labels (translations that are not 'Complete'). Please make sure your translation has no empty labels by using the online translation editor. Look for cells with a red background.
Can I upload a translation in a non-European language?
The application also supports non-European languages. Select 'Other' in the uploading process and introduce a valid two-letter ISO 639-1 language code. It is not possible to select a non-European language as the main language of your survey.
What does 'Request Machine Translation' mean?
EUSurvey can provide automatic translations of your questionnaire by using a Machine Translation (MT). The application uses the MT@EC service provided by the European Commission.
On the 'Translations' page, there are several ways to request machine translation:
- When adding a new translation, tick the checkbox 'Request Machine Translation' (for a translation of your survey's main language)
- Click the 'Request Translations' button in the 'Actions' column (for a translation of your survey's main language)
- Select all languages you want to be translated (including at least one complete translation). Then select 'Request Translations' from the select box below your translations and click 'OK'.
The status of the translations will change to 'Requested', until they are finished. To see when the status has changed, check the 'Translations' page.
Machine translations will behave like other translations you added manually, i.e. they will not be published automatically, and adding new elements to your survey will make them incomplete (to complete them, you'll have to request a new translation).
We cannot guarantee the quality of the resulting text or the delivery time for translations.
Machine translation - Help (EU staff only).
Instructions for EU staff
You are encouraged to contact DGT before you finalise your survey. Its Editing unit (email: DGT-EDIT) will check that your survey is clearly drafted and presented. For more info, see DGT's MyIntraComm pages .
You can also get your survey translated into the official EU languages by DGT. First export it as an XML file and send it via Poetry with the requester code of the DG concerned. It should be a maximum of 15 000 characters, excl. spaces (Word count).
Publishing a survey
How do I publish my survey?
To publish a survey from a current working draft, please go to the 'Overview' page and click on 'Publish'. After confirmation, the system will automatically create a working copy of your survey and put it online, along with the set of translations you have selected for publication on the 'Translations' page (See ' How do I publish/unpublish my translations? '). You will find the link to your published survey in 'Survey Location' on the 'Overview' page.
To unpublish your survey, just click the 'Unpublish' button. The unpublished survey will stay available to you in the form in which it was published, along with your current working draft. This means that the unpublished survey does not have to be replaced by your current working draft but can be republished if necessary.
Can I customise the URL to my survey?
Yes! By changing your survey's 'Alias' you can make the URL to your survey more meaningful. Open the survey and go to the 'Properties' page. Change your survey's alias under the 'Basic' section. An alias can only contain alphanumeric characters and hyphens. If you change the alias of a published survey, go to the 'Overview' page and click on 'Apply Changes'.
Please note that aliases have to be unique in EUSurvey. You will get a warning if your alias has already been taken by another survey.
Can I link directly to a translation of my survey?
When you send out invitations containing the link or use the link to the published form on the 'Overview' page, by default the link points to the form in the main language.
You can also redirect respondents directly to a specific translation by using this link:
https://ec.europa.eu/eusurvey/runner/SurveyAlias?surveylanguage=LC
Just replace:
- SurveyAlias with the alias of your survey
- LC with the appropriate ISO 639-1 language code (e.g. FR for French, DE for German, etc.)
How do I make my survey publish itself while I am on holiday?
You can schedule your survey to be published automatically at any time. Open the survey and go to the 'Properties' page. Enable the 'Automatic survey publishing' option under the 'Advanced' section, then specify the start- and expiry-date of your survey.
Can I receive a reminder of when my survey will end?
EUSurvey can send you an email reminder when your survey is about to end. This allows you to prepare the next steps (e.g. organising resources for result analysis).
To enable this option, open the survey and go to the 'Properties' page. Select 'Advanced Settings' section and, click on the 'Edit' button and enable 'End Notification', specifying how long in advance you expect an email. Click on 'Save'. The reminder email will be delivered to all form managers
For EU staff: What are the official requirements for launching an open public consultation ('Your Voice in Europe' website)?
Please carefully follow the procedure from the SG for launching an open public consultation on the Your Voice in Europe website.
Managing your survey
If I discover an error in my survey, can I correct it?
Yes, you can edit and change the survey as often as you want and add or change any additional (dependent) question. However, please note that the more changes you make the less usable the collected data will be, given that different participants in your survey might have responded to different surveys. So, to make sure that you can still compare the full set of answers, it is recommended that you avoid changing the structure of your survey at all. Please note that you are fully responsible for every change you apply to your survey during its lifetime.
If you do want to change an already published survey, please remember to click on 'Apply Changes' on the survey's 'Overview' page to make sure the changes are visible in the published survey.
If you want to remove answers from your survey, please Read: 'Will I lose any answers submitted when I change my form?'.
Will I lose any submitted answers when I change my form?
No answers are lost, unless you delete your survey from the system. However, you might not be able to visualize the full set of collected data if you have removed individual questions from your survey during the active period of your survey. This is because the search mask always represents the most recently published form only. Please select the 'Contributions (including deleted questions)' option from the drop-down list on the Results tab to visualize all answers, even those to questions that were removed during the active period of your survey.
How can I change the title of my survey?
Open the survey and go to the 'Properties' page. Change your survey's title under 'Basic' section. If you have already published your survey, go to the 'Overview' page and click 'Apply Changes'.
How can I change my survey's contact information?
Open the survey and go to the 'Properties' page. You can choose between the following 'Contact' options under 'Basic' settings:
- Contact Form: This allows users to contact you using a form.
- E-mail: This allows users to contact you directly by email (your email will be disclosed).
- Web-page: This directs users to a specific webpage.
If you have already published your survey, go to the 'Overview' page and click 'Apply Changes'.
How do I adjust the default confirmation message?
The confirmation message is what participants see when they have submitted their contribution. To change the default message, open the survey, go to the 'Properties' page and change the confirmation message under 'Special Pages'. If you have already published your survey, please remember to go to the 'Overview' page and click on 'Apply Changes'.
How do I adjust the default escape message?
The escape page contains the message that your participants see if your survey is not available. To change the default message, open the survey, go to the 'Properties' page. You will find the 'Unavailability Page' option under 'Special Pages'. If you have already published your survey, please remember to go to the 'Overview' page and click on 'Apply Changes'.
How do I give other users access to my survey?
In EUSurvey, you can grant access to other users for different purposes:
- Testing the survey ('Access Form Preview')
- Accessing the results ('Results')
- Editing the survey ('Form Management')
In order to provide them access, open your survey and go to the 'Privileges' page. You can grant access to a person or a department. The following access rights are possible:
- Green: Read and write access
- Yellow: Read access
- Red: No access
In order to proceed, please click on 'Add user' or 'Add department' on the 'Privileges' page. A window will pop up that guides you through the process of adding users.
By clicking on 'Add user', you will have to select the correct domain (i.e. European Commission), then enter the login, E-mail address or any other field and click on 'Search'. Then select the user and click on 'Ok'.
By selecting 'Add department', select the correct domain and navigate to the right department. Then click on 'Ok'.
External owners or survey organizers cannot see EU domains on the Privileges tab / Add users button, therefore, they cannot provide access for these persons directly. Please contact us to request privileges for external users.
You will then be redirected to the 'Privileges' page where you can set the right permissions by clicking on the red icons:
-
To grant the right to test your survey:
Change the colour of 'Access Form Preview' to 'Green'. Simply click on the colour to change the rights. The added users will automatically see the survey in their 'Surveys' page once they log in to the EUSurvey application (see also ' How can my colleagues test my survey before it is published? '). -
To grant the right to access the results of your survey:
Change the colour of 'Results' to 'Yellow'. The users can only view the results, but cannot edit or delete anything. If you change the colour to 'Green', they can view, edit and delete the answers (see also ' How do I give other users access to my survey's results? '). -
To grant the right to edit your survey:
By changing the colour to 'Yellow', the privileged users can only view your survey. But if you select 'Green', they can also edit it. They will automatically see your survey in their list of surveys (see also ' How do I give other users permission to edit my survey? '). -
To grant the access right to manage invitations of your
survey:
By changing the colour to 'Yellow', the privileged users can only view your invitations. But if you select 'Green', they can also edit it. They will automatically see your survey in their list of surveys (see also ' How do I give other users permission to edit my survey? ').
If you set all 4 circles to 'Green', the privileged user will have full rights permission to your survey.
What are Activity logs?
Activity logs monitor and log the activity on your survey. This way, you can check which user applied which change to your survey and at what time. You can also export the activity logs into several file formats such as xls, csv and ods. Enter the activity log of your survey by clicking on the 'Activity' page, next to 'Properties'. If the activity logs are empty, it may be that they are deactivated system-wide. Find here a list of the logged events.
Analysing, exporting and publishing results
Where can I find the contributions submitted by my respondents?
Open your survey in EUSurvey (also see ' How do I open an existing survey for editing etc.? ') and go to the 'Results' page. Initially, you'll see the full content of all submitted contributions in a table. You can view the results in 2 different ways:
- Full Content
- Statistics
You can switch view modes by clicking the icons in the upper left corner of the screen.
How can I extract the Draft answers?
On your Dashboard you can see the number of the saved Draft contributions for your survey. Your participants have the option to save their work as a Draft and continue the filling in a later time. According with our privacy policy, as a form manager you are not allowed to extract the Draft answers.
How can I access and analyse a defined subset of all contributions?
On the 'Results' page (see ' Where can I find the contributions submitted by my respondents? ') search for keywords in free-text answers or select individual answers from choice-questions in the filter bar. This limits the full set of answers to a subset of contributions. For performance reasons you can only set a maximum of 3 filters! At any point you can change the view mode, so you can carry out an advanced statistical analysis of the data collected. Note: to view and analyse results, you need certain privileges (see ' How do I give other users access to the results of my survey? '). To export a subset of contributions, please read 'How to Export a Survey and its Data?'.
How can I get back to the full set of answers, after defining a subset of contributions?
To visualize the full set of answers, click the 'Reset' button at the top of the 'Results' page or deactivate every search you've performed on the filter-bar on this page.
How can I publish my results?
Open the survey, go to the 'Properties' page and select 'Publish Results' section. Here you will find the URL of the published results and will be able to choose which questions/answers/contributions you would like to publish. You can also go there directly by clicking on 'Edit Results Publication' from the 'Overview' page of your survey.
Please be sure to select something in 'Publish Results' under 'Publish', otherwise the system will not publish any results.
How can I access the published results?
Open the 'Overview' page and click on the 'Published' hyperlink right next to the word 'Results'. This will direct you to the published results. Everybody who knows this address can access your results.
How do I give other users access to the results of my survey?
Open your survey, go to the 'Privileges' page and give results access to other users. Read more about this under ' How do I give other users access to my survey? '.
I cannot unzip my exported files
This might happen if the name of the files contained in your folder is too long. Windows has a maximum length of 260 characters for directory locations on the hard drive. Possible solutions for this are:
- Unzip the folder in the root directory of your operating system, e.g. unpack at 'C:' instead of 'C:\Users\USERNAME\Desktop'
- Or when unpacking the files, rename the target folder to shorten the directory length.
Published results - protection of personal information uploaded by participants
For data protection rules, the form manager has to actively make the choice to publish files uploaded to a contribution by the participant along with the other results. To do so, tick the 'Uploaded elements' check box in the corresponding section on the 'Properties' page under 'Publish Results' section. Please note that this check box will only appear if your survey contains an 'uploaded element'.
How do I design a survey to publish the results with or without personal information?
If you want to let your participants choose, whether their personal information will be published along with their answers, follow these instructions to build the survey to fit these requirements.
Why are my results not up-to-date?
A new database has been introduced which shall improve EUSurvey's performance when querying your survey's results. However, this can lead to some delays until the latest data is displayed on the Results page of your survey. This delay should not be more than 12 hours.
If the displayed data is older than 12 hours, please contact EUSurvey support .
How can I retrieve files uploaded by contributors?
EUSurvey offers different formats of export: XLS, PDF, ODS and XML.
Depending on the selected format, the structure and content of the
exported files for the 'File Upload' element is as described below:
Results export in XLS
-
An Excel file containing the following information:
Alias: Survey Alias (example: 6459a3c9-e517-4a34-8e5d-70185db022c3)
Export Date: Date in the format 'dd-mm-yyyy hh:mm' (example: 28-09-2020 15:28)A table composed as below:
- Each column represents a different 'File Upload' question.
- Each line represents a different contribution.
- Each cell contains all names of the uploaded files.
-
Folders corresponding to each contribution and named with the contribution ID. It contains sub-folders for each 'File Upload' question (Upload_1, Upload_2 etc.).
For instance:
Folder: 6cf0463c-29f4-4bea-a195-10e77c61dda1
Sub-folder: Upload_1 (corresponding to the first 'File Upload' question) contains all files uploaded.
Sub-folder: Upload_2 (corresponding to the second 'File Upload' question) contains all files uploaded.
Results export in PDF
-
Folder named 'PDFs' containing all survey contributions as PDF documents.
-
Folders corresponding to each contribution and named with the contribution ID.
It contains sub-folders for each 'File Upload' question (Upload_1, Upload_2 etc.).
Results export in ODS
-
An Open Office file containing the following information:
Alias: Survey Alias (example: 6459a3c9-e517-4a34-8e5d-70185db022c3)
Export Date: Date in the format 'dd-mm-yyyy hh:mm' (example: 28-09-2020 15:28)A table composed as below:
- Each column represents a different 'File Upload' question.
- Each line represents a different contribution.
- Each cell contains all names of the uploaded files.
-
Folders corresponding to each contribution and named with the contribution ID.
It contains sub-folders for each 'File Upload' question (Upload_1, Upload_2 etc.).
Results export in XML
This export is made of an XML file containing the results in a structured way.
Uploaded files are not available in that case.
How the ranking question score are calculated?
Ranking questions are used to offer the possibility to your survey participants to rank a set of items per order of importance. It is recommended to limit items to rank to 5. If you ask more to your survey participants it might be hard for them to properly rank all the items.
Survey respondents' most preferred choice (which they rank first) get the highest weight, and the least preferred choice (which they rank last) get a weight of 1. The weight is therefore proportionally reversed with respect to the ranking of the item.
For example, if a Ranking question is made of 5 items, weights are assigned as follows:
- The top ranked item has a weight of 5
- The second item has a weight of 4
- The third item has a weight of 3
- The fourth item has a weight of 2
- The fifth item has a weight of 1
The score is calculated as being the average weight given by survey respondents.
How to Export a Survey and its Data?
You can export both your survey's questionnaire and the responses you've collected. Below are the steps for exporting both:
Export Survey Responses (i.e. its Data)
To export the answers to your survey, follow these steps:
- Go to the 'Results' tab (the first screen, which displays the tabular view of your survey results).
- Click on the 'Export' button (a popup will appear).
- Enter a name for your export file.
-
Select your preferred file format for export (you'll be notified when the file is ready).
- Note: The exported data can be saved in an XLSX format, which offers greater security. For instance, you can encrypt the file using AES-256 to ensure sensitive data remains protected.
- Navigate to the 'Exports' tab.
- Download your file once the export is complete.
Export an Existing Survey (i.e. the questionnaire)
To export the full survey, including all your settings and structure, follow these steps:
- On the 'Surveys' page, search for the survey you want to export.
-
Click on the 'Export' icon next to your survey.
- Alternatively: Click on the 'Open' icon to go to the 'Overview' page, and then click on the 'Export' icon from there.
- Your survey questionnaire (i.e. the web form designed via the 'Editor') and settings will be saved to your computer.
- The exported file will have a .eus extension.
Design and layout
How do I change the general look and feel of my survey?
Open your survey, go to the 'Properties' page and select 'Appearance' section. Choose a new survey skin from the available skins under 'Skin' using the drop-down menu. Click on 'Save'. If you have already published your survey, please remember to go to the 'Overview' page and click on 'Apply Changes'.
How can I create my own survey themes?
On EUSurvey's 'Settings' page, at the top of your screen, select 'Skins' and click on 'Create a new Skin'. This will open the skin editor for survey themes. You can copy an existing theme as a basis and use the online skin editor to modify this template as necessary.
How do I add a logo to my survey?
To let your project/company logo appear in the top right-hand corner of your survey, upload an image file to the 'Appearance' section on the 'Properties' page. If you have already published your survey, please remember to go to the 'Overview' page and click on 'Apply Changes'.
How do I add useful links to my survey?
Open your survey, go to the 'Properties' page and select 'Advanced' section. Add labels and URLs under 'Useful links'. These links will appear on every page on the right-hand side of your survey. If you have already published your survey, please remember to go to the 'Overview' page and click on 'Apply Changes'.
Where do I upload background documents for my survey?
Open your survey, go to the 'Properties' page and select 'Advanced' section. Upload a file under 'Background Documents'. These documents will appear on every page on the right-hand side of your survey. If you have already published your survey, please remember to go to the 'Overview' page and click on 'Apply Changes'.
How do I create a multi-page survey?
Top-level sections of your survey can be divided into individual pages automatically. Open your survey, go to the 'Properties' page and select 'Appearance' section. Enable 'Multi-Paging' and click on 'Save'. If you have already published your survey, please remember to go to the 'Overview' page and click on 'Apply Changes'.
How do I enable automatic numbering for my survey?
To add auto-numbering to all sections and question elements of your form, open your survey, go to the 'Properties' page and select 'Appearance' section. Enable and select your preferences for 'Automatic Numbering Sections' and/or 'Automatic Numbering Questions', finally click on Save. If you have already published your survey, please remember to go to the 'Overview' page and click on 'Apply Changes'.
Can I create a customised skin for my survey?
To create a new skin for your survey, go to the 'Settings' page and select 'Skins'. Open the 'Create a new skin' tab where you can change the look of different elements of your survey: question and answer text, survey title, help text and many more.
First give a name to your new skin. Then select the item that you want to skin. On the right side of the screen you find a box where you can change the font of your item: foreground and background colour, font style, font family, font size and font weight. Below, in the 'Skin Preview Survey', you can immediately see how the modified item looks like in your survey. Then click on 'Save'.
If you want to change several items, you can modify one after the other and save them at the end when all items are finalised. It is not necessary to do a save after each modified item.
To adapt your survey to your new skin, go to the 'Properties' page and select 'Appearance' section. Choose your new skin in the 'Skin' drop-down menu. Then click on 'Save'.
Managing contacts and invitations
What is the 'Address Book'?
In the 'Address Book' you can create your own groups of participants. This way you can invite people or organisations who match certain criteria (e.g. 'male', and 'older than 21'). Every potential participant is stored as a contact in the address book along with an unlimited list of editable attributes. You can save any contact to your address book as long as they have an identifier ('Name') and an email address.
What are the 'Attributes' of a contact?
Each contact saved in the address book has a variable set of attributes such as 'Country', 'Phone', 'Remarks', etc. You can create a new attribute by editing a contact.
- In the 'Edit Contact' window, open the 'attributes' menu and select 'New...'.
- A new window will pop up where you can define the name of the new attribute.
- The newly created attribute will appear as a column in the address book and can also be added to a set of contacts.
How do I add new contacts to my address book?
Go to the 'Address Book' page and click on 'Add Contact' to add a single contact. You can click on 'Import' to upload an existing list of contacts in XLS, ODS, CSV or TXT format.
See also ' How do I import multiple contacts from a file to my address book? '
What is a 'Registration Form'?
A registration form can be understood as a survey that automatically creates contacts from the personal data that participants submit.
To enable this feature:
- Open your survey.
- Go to the 'Properties' page and select 'Advanced'.
- Enable 'Create Contacts' and click 'Save'.
When this is selected, the system inserts 2 compulsory free-text questions ('Name' and 'Email') to ensure that every participant enters valid personal data.
By enabling the 'Attribute' option for individual questions, you can choose what other information is stored about the newly created contact (e.g. a text-question with the attribute 'Telephone' can be used to store the participant's phone number in the address book).
How do I import multiple contacts from a file to my address book?
To import a list of contacts into the system, EUSurvey offers a wizard that guides you through the import procedure.
The following file formats are supported:
- XLS
- ODS
- CSV
- TXT (with separator).
To start the wizard:
- Select 'Import' from your 'Address Book' page.
- Select the file in which you have saved your contacts.
- Specify if your file contains a header row or not.
- Specify the type of separator you used for CSV and TXT files (the most probable character is suggested by default).
As a second step:
- The system will ask you to map the individual columns to new attributes for your contacts (the mandatory attributes 'Name' and 'Email' must be mapped in order to proceed).
- Once you click 'Next', the system loads your file into the system, displaying the individual contacts that will be imported. You can unselect individual contacts you don't want to import
- Click 'Save' to save your contacts to your address book.
How do I edit an attribute for multiple contacts at a time?
To edit an attribute value for multiple contacts:
- Search and select the contacts in your address book.
- Select 'Bulk Edit' and click 'OK'.
- In the pop-up, you can choose to keep, clear or set values for multiple contacts - by default, only the configured attributes will be shown.
- Click on the green cross to view other attributes.
- After clicking 'Update' and confirming the security message, the application will save your changes to your address book.
Can I export contacts from my address book to my computer?
Yes, on your 'Address Book' page, please click an icon in the top right-hand corner representing individual file formats.
You will find the exported contacts on the 'Exports' page.
Inviting participants
How do I specify a set of possible participants? What is a 'Guest List'?
In EUSurvey you can group selected contacts and send out individual emails to every single contact containing individual access links. This is called a 'Guest List'. It is the second way, in addition to the general survey password, in which you can give people the opportunity to complete your survey.
To invite multiple contacts to your survey, open your survey and go to the 'Participants' page. Choose one of the following types of guest lists to start a wizard that will guide you through the process:
-
Contact list
'Address Book'
Select contacts from the 'Address Book' (see ' What is the 'Address Book'? ') to add them to your guest list -
EU list
'EU institutions and other bodies' (EU staff only)
Select multiple departments from your institution/agency to add all persons working in those departments to your guest list -
Token list
Create a list of tokens (or 'Unique Codes') that can be distributed offline to access a secured online survey
Please use the search functionality on your address book and click the '>>' button on the middle of the next screen to move contacts from your address book to your new guest list. Clicking 'Save' will create a new guest list with all the contacts you want to invite to take part in your survey.
Please keep on reading to learn how you can send emails with individual access links to configured contacts from one of your guest lists.
How do I edit/remove an existing guest list?
- Open your survey.
- Go to the 'Participants' page.
- To edit the guest list, click on the little pen icon.
- To remove a list, first click on the 'Deactivate' button. Then you can click on the 'Remove' button to delete the list.
How do I send my participants an invitation email?
Once you have created a new guest list, you can send them invitation emails.
For 'secured' as well as for 'open' surveys, everyone will receive an individual access link.
This means that everyone who receives an email invitation sent from EUSurvey can only submit one single contribution.
- On the 'Participants' page, click on the little envelope icon.
- A window will open where you choose an email-template from the 'Select mail design' box - by default, the used style is 'EUSurvey'.
- You may then change the subject and content of your email and add a 'reply-to' email address - all replies to your invitation email will then be sent to this address.
- Save your email text. It will be available for all your guest lists and surveys - you will find it in the dropdown list of the 'Use mail template' box.
- Click on 'Next'. A wizard will guide you through the invitation process.
How to use tokens to create a link?
In order to create a list of tokens (authentication tokens) that can be distributed to access a secured online questionnaire, open your survey and go to the 'Participants' page. Click on 'Create new guest list' to start a wizard that will guide you through the process. Choose a name for the group and select 'Token list' from the types of guest lists.
Use the created tokens to build up individual access links you can send per emails to the participants using the URL below:
https://ec.europa.eu/eusurvey/runner/SurveyAlias/TOKEN
Just replace:
- SurveyAlias with the alias of your survey
- TOKEN with one of the tokens from the token list
Managing your personal account
How do I change my password?
Access to the EUSurvey reference installation at the European Commission is managed using EU Login, so EUSurvey users are asked to change their EU Login password if they have lost it. This can be done by clicking on 'Forgot your Password?' on the EU Login page.
How do I change my email address?
If you access EUSurvey using an EU Login user account, you cannot change your email address in EUSurvey. Instead, connect to EU Login and after login, select 'Modify my personal data' from the 'Account information' tab.
If you use the OSS version of EUSurvey or you're a business user of the API interface, please connect to the application. Under 'Settings' > 'My Account' > click on 'E-mail'.
How do I change my default language?
It is possible to change the default language for new surveys. Go to 'Settings' > 'My Account' and click on 'Language'.
Once the update is saved, the system will propose the configured language as the primary language for any new surveys you create.
Data Protection and Privacy
This system uses cookies. What information is saved there?
The system uses session 'cookies' to ensure reliable communication between the client and the server.
Therefore, the user's browser must be configured to accept 'cookies', which disappear once the session has been terminated.
The system uses local storage to save copies of the participant's input to a survey. This is to ensure there is a backup if the server is not available during submission, the user's computer is switched off accidentally, etc.
The local storage contains the IDs of the questions and the draft answers.
Once a participant has submitted their answers to the server or has saved a draft on the server, the data is removed from the local storage.
There is a checkbox above the survey - 'Save a backup on your local computer (disable if you are using a public/shared computer)' - to disable this feature. In that case, no data will be stored on the used computer.
What information is stored by EUSurvey when participants submit a contribution?
The information that is saved by EUSurvey depends on the security settings of your survey as well as on the method you use to invite your participants to contribute to your survey.
Publicly accessible open survey:
By default, if your survey is not secured, EUSurvey does not save any user-related information.
However, the IP of every connection is saved for security reasons for every server request (see privacy statement on the protection of personal data ).
Survey secured with a password:
If your survey is secured by a password only, EUSurvey does not save any user-related information.
However, the IP of every connection is saved for security reasons for every server request (see privacy statement on the protection of personal data ).
Survey secured with EU Login authentication:
If your survey is secured by EU Login authentication, EUSurvey will save the email address of the EU Login account.
In addition, the IP of every connection is saved for security reasons for every server request (see privacy statement on the protection of personal data ).
Sending invitations using EUSurvey:
If you use EUSurvey to send invitations to your participants on a guest list on the 'Participants' page, it will send an unique invitation link to each participant.
On submission, EUSurvey will save an invitation number that can be used to match the invited participant with the submitted contributions. This action is independent from your survey's security settings.
Furthermore, the IP of every connection is saved for security reasons for every server request (see privacy statement on the protection of personal data ).
Creating an anonymous survey:
You can create an anonymous survey by activating the 'Anonymous survey mode' in the Survey Properties.

To do so, go to Properties > Survey Security and enable 'Anonymous survey mode'. When this option is activated, no user-related data (including IP addresses) will be collected or stored.
To ensure your survey remains fully anonymous, you must also avoid including any questions that request personal data within the questionnaire itself.
Please note that once your anonymous survey has been launched and responses have been collected, the anonymous mode cannot be deactivated. It is not possible to revert the survey back to a non-anonymous mode after responses have been submitted.
Do I need to include a privacy statement?
This depends on the questions you ask and the type of data you collect from your survey.
Please note that your participants may not want to take part if you cannot guarantee the confidentiality of the data submitted.
For EU staff only:
We draw your attention to the policy on the "protection of natural persons with regard to the processing of personal data Regulation (EU) 2018/1725 .
If personal data is collected, a privacy statement must be drafted and then published together with the questionnaire.
Please contact the DPC (Data Protection Coordinator) of your DG in order to validate the privacy statement.
Additionally, any collection of personal data must be notified to the Data Protection Officer (DPO). Please contact your DPC if you need assistance for notification to the DPO.
Please find below a privacy statement template that you could use for your surveys. You must change and adapt it to your needs:
Template: 'Privacy Statement template for surveys and consultations'
We need a Data Processing Agreement, where is the EUSurvey DPA?
The EUSurvey Data Processing Agreement (DPA) is available for all entities that are considered as Data Controller while we are processing your data through the EUSurvey platform. EUSurvey DPA is available here.
If you have any questions, please feel free to contact us.
Someone has contacted me to access, modify or delete all or part of their personal data - what should I do?
Survey managers are responsible for managing the personal data collected as part of the survey. As a survey manager, you must respond to requests received from your survey participants in relation to data protection.
In order to access, rectify or delete personal data collected as part of your survey, you can go to the results screen and search for the personal data in question using the available filters. You can then delete or modify them either by editing the contribution or by deleting the contribution entirely.

Regarding email addresses as well as first and last names, the other parts of the system where this data may be saved are the guest lists ('Participants' tab) or your 'Address Book'.
Bulk deletion of answers
You can delete an entire column from your survey results. This will have the effect of 'emptying' (i.e. permanently deleting) all responses to the corresponding question. This can be useful for anonymizing results, for example in the context of GDPR compliance.
To bulk delete answers:
- Go to the 'Results' tab.
- Find the column for which you want to delete the answers in bulk.
- Click on the 3 dots icon.
- Select 'Blank answers'.
- Confirm the deletion.
All answers collected for the corresponding question will be permanently removed.
Automatic deletion of inactive surveys
1. What is an inactive survey?
In EUSurvey, a survey is considered inactive when it no longer receives new contributions.
If a survey does not receive any new contributions for one year (365 days), it may be marked as inactive and become eligible for the automatic deletion process.
2. Why are inactive surveys deleted?
To maintain a high-quality service and optimise system performance, EUSurvey may automatically delete surveys that have been inactive for a long period.
This process also helps ensure compliance with the General Data Protection Regulation (GDPR) and the Regulation (EU) 2018/1725 (EUDPR) and their respective data retention requirements.
Before any deletion takes place, survey owners and privileged users receive several email notifications giving them time to review the survey and take action if necessary.
3. How does the inactive survey deletion process work?
When a survey has not received new contributions for one year, EUSurvey starts a notification process before deletion.
The process works as follows:
- The survey owner and all privileged users receive a first email notification informing them that the survey is inactive and is subject to deletion.
- A second reminder email is sent if no action is taken.
- A third and final notification is sent before deletion.
- If the survey remains inactive after these notifications, the survey is automatically deleted from the system.
This staged notification process ensures that users have sufficient time to review the survey and preserve their data if needed. The timing is subject to configuration changes but initially it has been set to 60 days, 45 days and 3 days before deletion.
4. Who receives the inactivity notifications?
Notifications are sent to:
- the survey owner
- all privileged users who have management rights for the survey. For example, users with the role of Form Manager will also receive these notifications.
5. What should I do if I receive an inactivity notification?
If you receive an inactivity notification from EUSurvey, you should review whether the survey is still needed.
Possible actions include:
- exporting the survey results (e.g. .XLSX file) for archiving - please refer to the relevant FAQ article
- exporting the survey questionnaire as an .EUS file
- reviewing or updating the survey or collecting new contributions if the survey is still in use so that it will be out of the deletion process
Exporting the questionnaire as an .EUS file allows you to store the survey questionnaire and import it again later if needed.
If no action is taken and the survey remains inactive, it will be automatically deleted after the notification process.
6. What if I still need help?
In this case, please submit a formal support request here: Contact us and select the option 'I have a question about the automated deletion of my survey'.